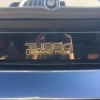
Heartbeat1991 Posted October 4, 2014 Author Report Posted October 4, 2014 I have to ask, how did you repaint the center caps? I have just been hunting for 4 new ones, so far I am halfway there With model paint and a toothpick. It's not perfect, but from 2 feet away you can't tell the difference. It took a while to do all 4. Quote
intern8tion9l Posted October 4, 2014 Report Posted October 4, 2014 Geez that must have taken forever! I did the konig caps on mine with model paint and a tiny brush, and they are way less lettering Quote
mfewtrail Posted October 4, 2014 Report Posted October 4, 2014 With model paint and a toothpick. It's not perfect, but from 2 feet away you can't tell the difference. It took a while to do all 4. You have more patience than I do. I would have gotten some overlays printed up that I could just stick on. Quote
Heartbeat1991 Posted October 5, 2014 Author Report Posted October 5, 2014 I never thought of overlays. . This was free and I didn't have to wait for anything. I am pretty sure I found new ones somewhere online recently. I can't remember where. They were listed for like $11 each. Quote
Heartbeat1991 Posted October 5, 2014 Author Report Posted October 5, 2014 Geez that must have taken forever! I did the konig caps on mine with model paint and a tiny brush, and they are way less lettering I used a small brush for the ABS part. The outer letters are smaller and mostly linear lettering. The toothpick allows more control. Quote
Heartbeat1991 Posted October 5, 2014 Author Report Posted October 5, 2014 If you get close, you can tell they were re-painted. They are far from perfect. But not bad from a couple feet away. Standing next to the car looking at them you can't tell. That's what counts. I sprayed a decent amount of clear lacquer over them to seal it all up. Quote
GOT2B GM Posted October 6, 2014 Report Posted October 6, 2014 In no way do I have the patience or the time for that LOL Quote
Euro Posted October 6, 2014 Report Posted October 6, 2014 This car is turning out great. I like the job you did on the center caps! I don't think I'd be able to do as good a job there, model detailing like that I am NOT good at Quote
Heartbeat1991 Posted October 18, 2014 Author Report Posted October 18, 2014 Trunk and roof are just about ready to be sprayed. I just need to clean up the edges of the roof, and the key hole in the trunk. Quote
Garrett Powered Posted October 18, 2014 Report Posted October 18, 2014 How do you do that? stripper? Quote
Heartbeat1991 Posted October 19, 2014 Author Report Posted October 19, 2014 The roof is stripped then sanded. The trunk was all sandpaper. I stripped the hood with stripper, but only down to the primer, then I sanded the rest. Sanding takes forever. But stripper leaves residue that has to be cleaned many times, and it still requires plenty of sanding, also. Quote
RobertISaar Posted October 19, 2014 Report Posted October 19, 2014 .................. i would be tempted to clear the roof and leave it that way. Quote
Heartbeat1991 Posted October 19, 2014 Author Report Posted October 19, 2014 No way. That would be a ton of work to smooth it out that much. I wouldn't like the look either. It will be black, likely tomorrow or Tuesday. Quote
Gibby Posted October 19, 2014 Report Posted October 19, 2014 Havnt checked in here for a while. Glad to see this coming along! Gonna be one nice car Dan. Quote
Heartbeat1991 Posted October 20, 2014 Author Report Posted October 20, 2014 I'm still keeping my eyes peeled for a seat for yours, Luke. Quote
Gibby Posted October 20, 2014 Report Posted October 20, 2014 Well you don't owe me anything, so don't waste too much time. I wouldn't of had it in me to do what you're doing. I am definately in for more progress here though. Quote
Heartbeat1991 Posted October 20, 2014 Author Report Posted October 20, 2014 I'm not actively looking. Just keeping my eye out if I run across one. I'm not doing much. I just cleaned it up and put it back together. Quote
Heartbeat1991 Posted October 29, 2014 Author Report Posted October 29, 2014 Sprayed the Roof, Hood, Louvers, and trunk today. Came out decent. It needs a rub out and buff, but that's the downside to painting outside. I shot some clear over a couple spots that needed it. I painted the top of the rear bumper and blended it down. But given the difference in the shine from new to old, even after buffing up the old, I'm going to have to scuff and shoot the rest of the car later this week to make it all match better. Quote
Heartbeat1991 Posted October 29, 2014 Author Report Posted October 29, 2014 I touched up these areas with clear to cover up some minor clear cost scratches and road spray thinking I'd be able to wet sand and buff to match, but the old paint just doesn't buff out enough to match to my satisfaction. So I will just shoot the rest of the car. I'll have to get better pics in the AM. Quote
94 olds vert Posted October 29, 2014 Report Posted October 29, 2014 Should have painted the entire car. The areas you painted look great. Quote
Heartbeat1991 Posted October 29, 2014 Author Report Posted October 29, 2014 Should have painted the entire car. The areas you painted look great. The rest of the car looked pretty good as it was. That's why I only fixed the problem areas. But I sprayed 5 or 6 coats of clear on it. So those areas look a lot better. I'll spray the rest of the car later this week. I'll likely just scuff and clear the rest. Quote
Psych0matt Posted October 29, 2014 Report Posted October 29, 2014 You need to do mine. I will pay you in cartons of pizza rolls Quote
Heartbeat1991 Posted October 29, 2014 Author Report Posted October 29, 2014 You need to do mine. I will pay you in cartons of pizza rolls Gonna be a lot of pizza rolls, Buddy. LOL. The material alone was $500. That's mid grade stuff. Then there is the whole Michigan/Connecticut thing. . . . Quote
94 olds vert Posted October 29, 2014 Report Posted October 29, 2014 Did you rattle can this? I am thinking not, those are good results I assume you used a spray gun? Quote

Recommended Posts
Join the conversation
You can post now and register later. If you have an account, sign in now to post with your account.