All Activity
- Past hour
-
Need to know some info about replacing the strut cartridge?
ron350 replied to 89-W-Body-Regal's topic in Brakes/Suspension/Steering/Wheels/Tires
This tool acts as a handle that screws onto the threads on the end of the strut. Once installed you can move the strut around so you can center the strut in the hole. On my 96 the strut shaft wanted to move in the direction of the motor. I had to use pieces of wood wedged between the iner-fender and the strut spring to center the strut shaft so the removal tool would fit down the hole to the nut. Without this petitioning tool i could not have changed my front struts.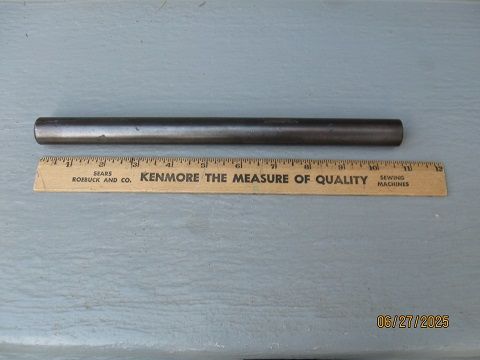
-
Need to know some info about replacing the strut cartridge?
ron350 replied to 89-W-Body-Regal's topic in Brakes/Suspension/Steering/Wheels/Tires
This tool in my kit was useless because it was too big to fit in the hole. Maybe this tool will work on your 98?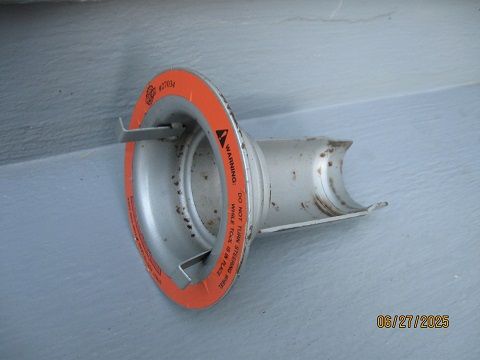
-
Need to know some info about replacing the strut cartridge?
55trucker replied to 89-W-Body-Regal's topic in Brakes/Suspension/Steering/Wheels/Tires
After removing all of the upper strut mount retaining paraphernalia one makes use of that deep extension, it goes right down over the extended shock piston, at the top end is a square 1/2" drive ratchet opening, one turns the ratchet counterclockwise to undo the retaining nut below on the top end of the knuckle. I've never made use of the short extension at all seeing as it will not clear the shock piston that would be extended (assuming the shock cartridge still has gas pressure inside). If you need to insert the spreader down the shock tower opening first to keep the shock cartridge in loose alignment so as to remove it & reinstall it. The spreader is that wide mouth gray device. The small socket adapter at the upper right is the adapter one uses to both remove & install the shock piston retaining nut, one slides the adapter down over the nut, the short arm is for a ratchet to turn the nut, the opening in the centre is for the #50 torx bit that slips into the female torx thread on the end of the piston shaft. One holds the torx bit still while one turns the ratchet, this prevents the piston from turning inside the shock housing. But note that most aftermarket shock cartridge replacements no longer use that torx thread, you may find that the new shock has an Allen head thread on the end of the shock piston. - Today
-
Need to know some info about replacing the strut cartridge?
ron350 replied to 89-W-Body-Regal's topic in Brakes/Suspension/Steering/Wheels/Tires
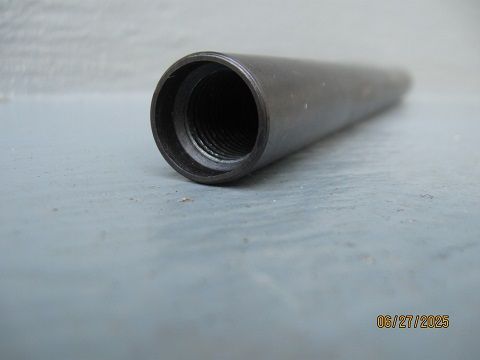
This thread needs more pictures. The round business end of the 10 inch long tool is 2-1/4 inches in diameter. You can see from the picture that the factory nut is slightly wider at about 2-3/8 inches. So if the factory strut retainer nut can fit down the shaft (hole) so can the tool in my picture.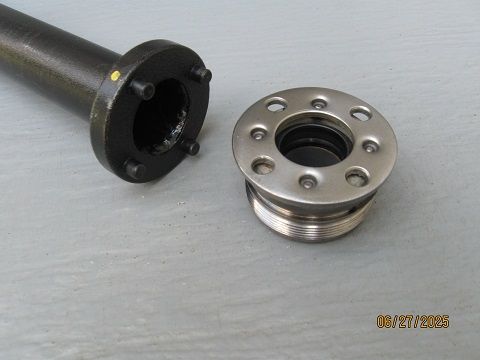
-
Need to know some info about replacing the strut cartridge?
89-W-Body-Regal replied to 89-W-Body-Regal's topic in Brakes/Suspension/Steering/Wheels/Tires
I did watch the video and seen it. But on my regal there isn’t enough access to fit down that tool to loosen the cartridge nut. That’s why I am going to show everyone a video in here of it as I do it. I can do everything until that part when it comes to putting the tool down the strut tower to remove that nut I can’t fit it in there. -
Need to know some info about replacing the strut cartridge?
ron350 replied to 89-W-Body-Regal's topic in Brakes/Suspension/Steering/Wheels/Tires
The guy in the video in post #3 is using the same 10 inch long tool with the 4 roubd pins sticking out the buisness end. You should be seeing the same parts as shown in the video unless your 98 is different. -
Need to know some info about replacing the strut cartridge?
89-W-Body-Regal replied to 89-W-Body-Regal's topic in Brakes/Suspension/Steering/Wheels/Tires
-
Need to know some info about replacing the strut cartridge?
ron350 replied to 89-W-Body-Regal's topic in Brakes/Suspension/Steering/Wheels/Tires
This is the same kit i have and you need the strut retainer tool on the far left. That tool is 10 inches long and can reach deep enough to do the job. You can find these kits on ebay for less than $100 if you wait and watch for them.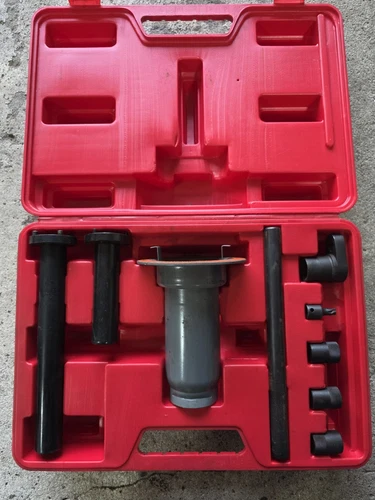
-
Need to know some info about replacing the strut cartridge?
89-W-Body-Regal replied to 89-W-Body-Regal's topic in Brakes/Suspension/Steering/Wheels/Tires
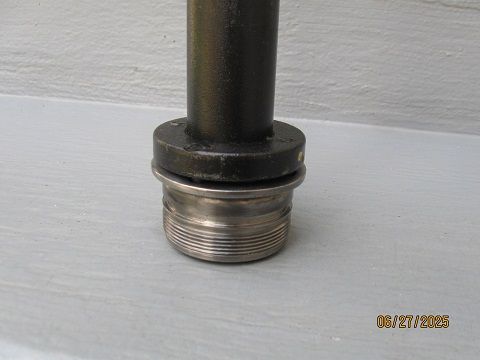
according to my Buick shop manual everything I needed is in here, I know some tools are missing in this kit. When you can let me know which tool you’re referring too. -
Need to know some info about replacing the strut cartridge?
55trucker replied to 89-W-Body-Regal's topic in Brakes/Suspension/Steering/Wheels/Tires
You sure beyond a doubt that what you have there isn't missing one of the long collars to remove the cartridge retaining nut? I do not see it there, it's approx 13 maybe 14" long, it's THAT collar that slides down from the top inside past the bellows to the top of the knuckle to turn the cartridge nut. I can't show you what mine looks like as I'm not home right now. -
Need to know some info about replacing the strut cartridge?
89-W-Body-Regal replied to 89-W-Body-Regal's topic in Brakes/Suspension/Steering/Wheels/Tires
Here’s the kit I try to use. It was the official kit Buick service manual told me to use that dealerships used back then to service the cartridges.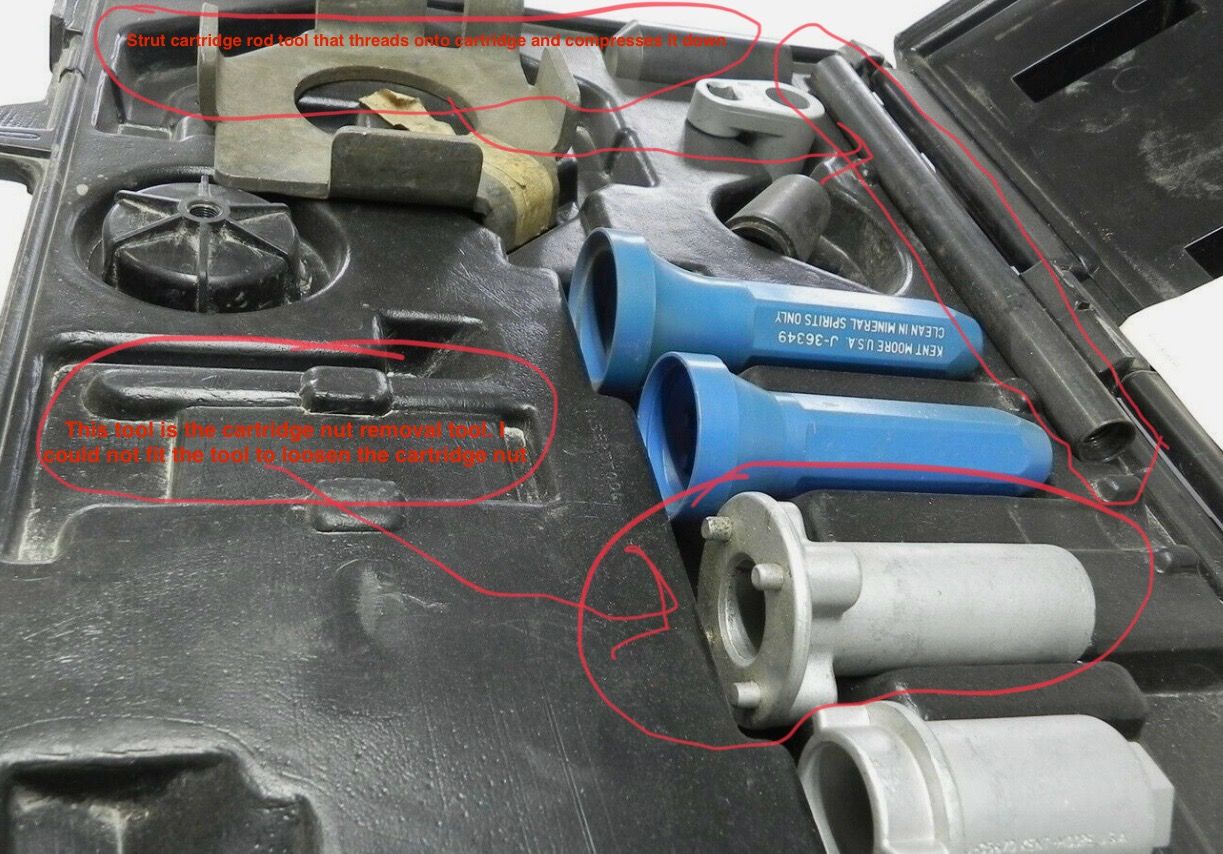
-
Need to know some info about replacing the strut cartridge?
89-W-Body-Regal replied to 89-W-Body-Regal's topic in Brakes/Suspension/Steering/Wheels/Tires
I will show a video on here when I begin to do it again. And when I come to the part where the spanner nut and cartridge tool won’t fit down in the strut tower I’ll show that part. I was able to move the nut with the impact. I was able to remove the rubber mount too. After that I was able to screw the cartridge removal bar onto the top of cartridge in the tower and I was able to compress the cartridge down with that tool. But I couldn’t fit the spanner nut to loosen the cartridge. It’s complicated to explain so I will make the video. -
 FooMaster joined the community
 - Yesterday
-
 jiggity76 reacted to a post in a topic:
TRW Keyless Entry module
jiggity76 reacted to a post in a topic:
TRW Keyless Entry module
-
White93z34 reacted to a post in a topic:
TRW Keyless Entry module
-
Should be 2 or 3 bolts on the seat bottom facing the rear of the front seats. Remove the bottom seat cushion and then you will see the bolts that hold the back seat cushion on.
-
How does the seat first get removed? Sorry not very car inclined here. Mine is the 4 door sedan.
-
That's not the problem, it just doesn't go all the way down so that you can put the boot on it. Both sides go up and down.
-
I didn't know either until @Black92GS's reply earlier in the thread. It's also elsewhere on the convertibles since there's no rear deck.
-
That's interesting. My bad...I thought they were all in the same location. My Cutlass coupe is also in the back shelf area. The rear glass is allowing more space for it I'm sure than a Regal coupe.
-
If it's a coupe, it's where @Black92GS showed a few posts up. If a sedan, on the back deck as @jiggity76 shows. Regal coupes had a much smaller rear deck due to the more vertical backglass. Top is sedan, bottom is coupe.
-
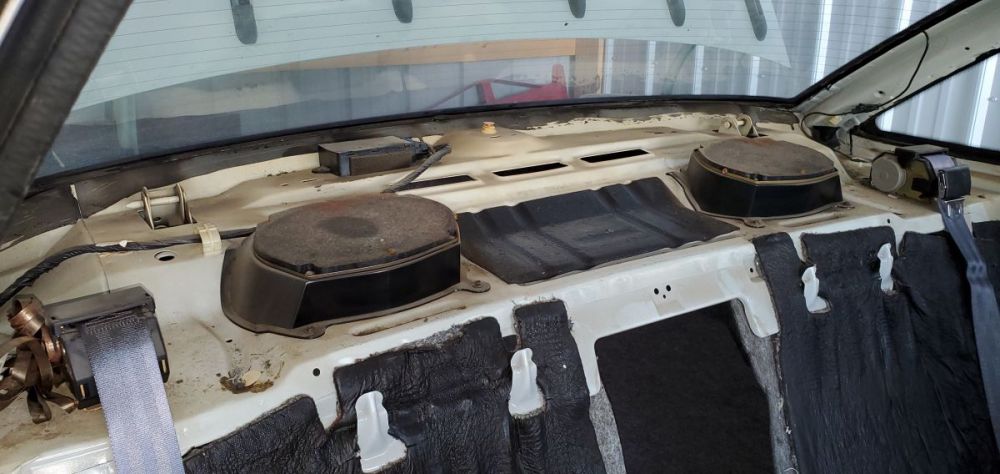
The receivers are mounted up in the back glass shelf area. The upper rear seatback needs to come out...which means the shelf also needs to come out. Then, to get the shelf out, you have to pull the rear quarter glass interior plastics that go around the glass. GM layered these pieces. Here's my 93 Grand Prix STE sedan. It won't be identical, but it will be the same process and in the same location. That black box up against the rear glass...that's the receiver.
-
Reviving this thread! So would the receiver be at the back under upholstery or passenger door for my 1995 Regal GS? Can't seem to figure out how to get under the upholstery as well unless I just gotta pry and yank, which makes me nervous for this old car...
- Last week
-
It's actually a very easy install. I did it on my '91 Cutlass Supreme coupe on my lunch hour from work. If you're going with an aftermarket head unit, be sure to spring the extra few dollars for the wiring harness adapter, which allows a plug-and-play connection between the new radio and the car, without cutting any wires. You can easily do the installation in under an hour. When I was married, it made a fun afternoon project with my then-stepdaughter to replace the dead radio in her mom's Jeep Grand Cherokee. I taught her how to use a soldering iron as part of the process, and she had a great sense of accomplishment when we turned it on and put in her favorite CD to test it out.
-
I had to replace the pistons on my '95 vert last fall. They guy at the trim shop said he only replaced them in pairs because when one went, the other wasn't far behind, and it was far more cost effective in terms of labor to do them at the same time. The pistons cost $350 each, which accounted for about half of the total bill. I love that car, but it is an expensive habit, for as little as I drive it.
-
You could have a broken piston on the side that isn't working. I encountered this on my '95 vert last fall. I took the car out for some exercise on a warm afternoon in October, and when I put the top down, there was a loud 'POP', which I found out later was the piston actually snapping off. When I later tried to put it back up, only one side came up. I finally got the top completely up by having a friend operate the switch, while I assisted the broken side to keep it even with the side that was working. I took it to a trim shop a few weeks later, and the guy replaced both pistons, and stapled and screwed the top back into place where it had come loose between the rear seat and trunk lid, and it's been working fine ever since, actually better than it had before. He said he always replaced those pistons in pairs because when one breaks, the other is usually not far behind, and doing them both at once saves significantly on labor.
-
Need to know some info about replacing the strut cartridge?
55trucker replied to 89-W-Body-Regal's topic in Brakes/Suspension/Steering/Wheels/Tires
Please elaborate.....neither the bottom spring seat nor the upper spring seat are fastened to the knuckle, the lower seat, the spring, the upper seat are held in position by the force of the compressed spring against the upper & lower seats. The retaining nut at the top of the shock piston working against the rubber mount keeps everything together. -
Need to know some info about replacing the strut cartridge?
89-W-Body-Regal replied to 89-W-Body-Regal's topic in Brakes/Suspension/Steering/Wheels/Tires
I have that tool it wasn’t included in the kit I got off Walmart. So I had to buy it off eBay. I had to send the kit back when I wasn’t able to remove the cartridge. The seat is fastened to the top of the knuckle so I couldn’t fit the spanner nut tool down into the tower to remove the cartridge nut. There wasn’t even access to fit that tool you circled to keep the strut elevated from moving. I need to correct a video showing everyone what I am having trouble with. So I can get this done asap. I would love to work on this myself. No one knows how to work on these cars around me. So I’ve been doing all the repairs myself and learning from people in these forums and on fb.