|
Tired of trying to squint for light on a dark road, and the fog lights aren't still doing enough? Well, for any of you Generation I coupe / convertable Cutlass' or coupe Grand Prix's with the sealed 'mini quad' headlights, this upgrade is for you. Since the the stock headlights are sealed beams, the whole casing needs to be replaced and that can cost a fortune; replacement bulb can be about half the cost and have better light / color outputs. The installation itself is fairly simple; but some deconstruction is needed for this modification.
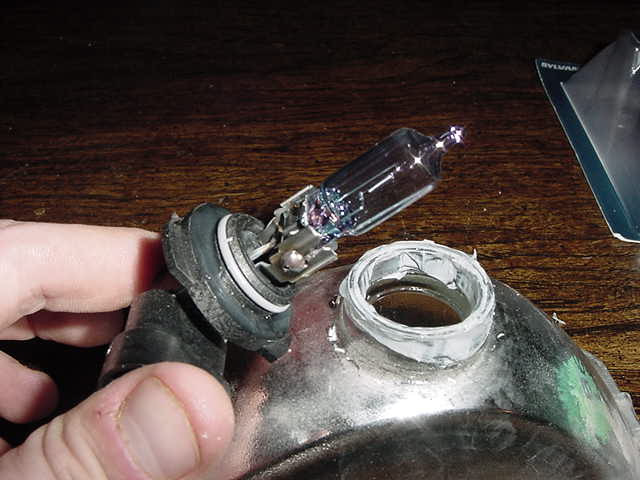
When removing the old bulb and aftercleaning off the old adhesive on the lens, the lens should look like this. The bulb that's held is the new replacement bulb and any style, color, and brightness is up to you. But before you install some hefty priced ones, double check to make sure they'll fit on your wiring harness on the car.
1.) Remove a headlight(s) from the car by removing the light bezels and disconnecting any hardware the light has. Make sure that you mark / remember which side the harness of the bulb plugs in to. Mark that side on the back of the lens. The new bulb must be installed in exactly the same direction as the old one; important info for installation later in process.
2.) Remove the old bulb from the lens. Use a large flat head screwdriver or a pair of pliers to pry between the base of the lens, and the plastic of the bulb. ** Don't get too forceful with it though, you can break the lense if your not careful. ** Work your way around the base of the bulb until it comes free from the glue.
3.) After removing the bulb, remove all the old glue. Use a hobby / exact-o knife to accomplish this. Make sure none of the glue is left in the lens; also, if lens is dirty, it can be washed out with some luke-warm water / soap solution. If washed let dry and inspect again for any old glue and cracks / chips.
Notice how the new replacement bulb sits flush on the lens; the old glue should come off down to the lens so that good contact can be made when installing / glueing bulb. Use some solvent or laquer linner if having problems getting good contact on materials.
4.) Locate the new bulbs; remember you can use model number 9005 (brights) and 9006 (dims) for replacement. ** It is up to your discression to install bright bulb as the dim headlights, but other drivers and law enforcement might complain and ask to be fitted with the correct lighting. ** Different shades and color tones are acceptable in the United States, but if you have questions, check with your local Department of Motor Vehicles to get the latest on rules and regulations.
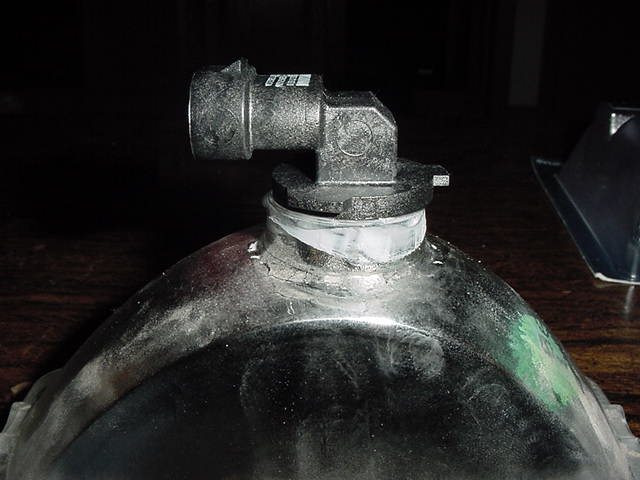
5.) Lay the bulb on to the lens, place glue on both the lens base and the flat base of the bulb. Place the bulb onto the lens and spread the glue around by twisting it slowly. Align bulb appropriately straight, and let it sit for silicone to cure. Apply more glue if not all of the base of bulb is covered. ** It's been recommended to use a rubber-band to hold the newly glued blub in place to get an air-tight fit / seal. **
6.) Once finished, and allowed the glue to fully cure, re-install lights back onto car. Check to sure they work, and make sure they are aligned properly. Re-install headlight hardware, light bezels, and shut hood.
- Average Time: 30 - 60 minutes to clean leses / half day for silicone
- Scheduled Maintenance: whenever burnt out, cracked, or poor lighting
- Price of Items: RTV silicone ~ $3.00
replacement light bulb(s) ~ $12.00+ (each)
extra lenses (@ junkyard) ~ $5.00 - 10.00+
- Written by Luke "LukeZ34"
- Pictures by Luke "LukeZ34"
- Edited by Erik Melander
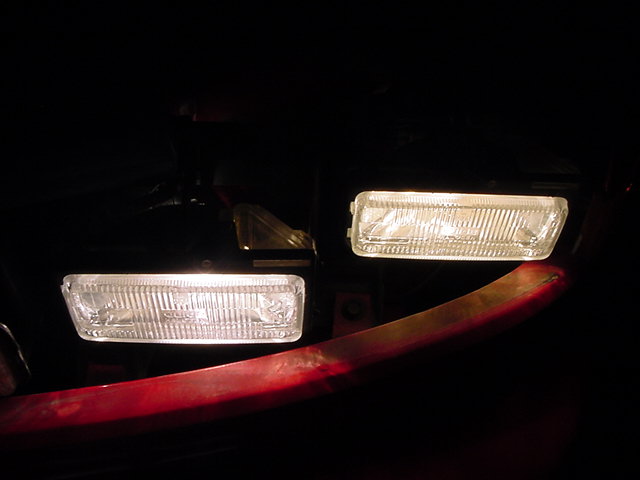
Finished project: notice the color tone differance of the left lens (replacement bulb) versus the stock headlamp. * Shown is dim (regular) beam in bright headlamp area to show difference in power output. It is NOT recommended to prolong use of mis-match bulb for the electrical circuit: could overload and blow fuse or burn up wiring harness. * The left of the left contains Sylvania Silverstars - model 9006 (dim). Thanks Luke for the pictures and installation!
|