|
A specific problem that has occurred to many 3.4 Liter DOHC engines is a leak in the intake gaskets. Typically the symptoms occur at a cold start of the engine. The RPM's will rocket up to the park rev limiter, then dip with an extreme stutter down low, most times to the point of stalling. Touching the throttle to prevent stalling only causes the RPM's to rocket once more, to remain there for a while until the computer pulls back on the fuel, even if no accelerator pressure exists. At idle, a noticeable *putt-putt* sound exits the mufflers, sounding as if a cylinder is misfiring or not at all. Attempting to drive the vehicle in this condition is annoying to say the least. The RPM's will continue waver up and down, causing the car at idle coasting to surge up and then fall back down in speed. When accelerating, the feedback is terrible - not slowly increasing as pedal pressure is increased, but a sudden burst of power, and acceleration in "steps & bursts"; basically the worst responsiveness one could experience. If an SES (Service Engine Soon) light triggers, it is usually because there is a major conflict with the data between the Mass Air Flow sensor, Idle Air Control valve, and Oxygen sensor. Basically, the computer picks one that isn't operating properly as compared to the other emissions sensors. It is all due to un-metered air; which means, air that is entering the throttle-body or vacuum leak in an area not metered by the Mass Air Flow sensor (explained in more detail below) and all the sensors conflict and the computer tries to compensate for the data (hence the wavering idle). This is all just theory, but in a sense, it is what is going on inside the computer and engine.
As the engine warms, it expands. The aluminum intake manifold, heads, and plenum all reach normal operating temperature and seal the gap where the un-metered air is entering the engine. It will idle, as it should with no wavering RPM's on warm engine re-starts, and have normal throttle response and acceleration. If these are the symptoms you are experiencing, chances are it is a faulty intake gasket. If you have an SES light, don't begin to assume it is the reason for your this idle problem. The reason one should not go about replacing sensors first is because: a) they can be expensive; b) they are probably working fine; c) a mechanical failure [such as the gaskets] cannot be diagnosed through the computer. The sensors monitor intake airflow, and exhaust flow also including a variety of idle control sensors and fuel management sensors. They all work together to ensure the operating efficiency of the emissions do not decrease as the car ages. These sensors only work well enough if all other mechanical issues are working properly as well. Air is metered as it enters the intake, and the computer adjusts accordingly for idle or acceleration with the assistance of the other engine management sensors. If air is entering the intake that has not been metered through the throttle body, such as with an intake gasket leak, the computer does not have an accurate measurement for a proper air/fuel mixture. The computer is only providing the necessary fuel to the engine from the information it has received from the sensors metering the air from the intake. It may try to compensate for the high idle by reducing fuel, and the computer will continue to attempt to compensate for the low idle by adding fuel - hence the wavering idle.
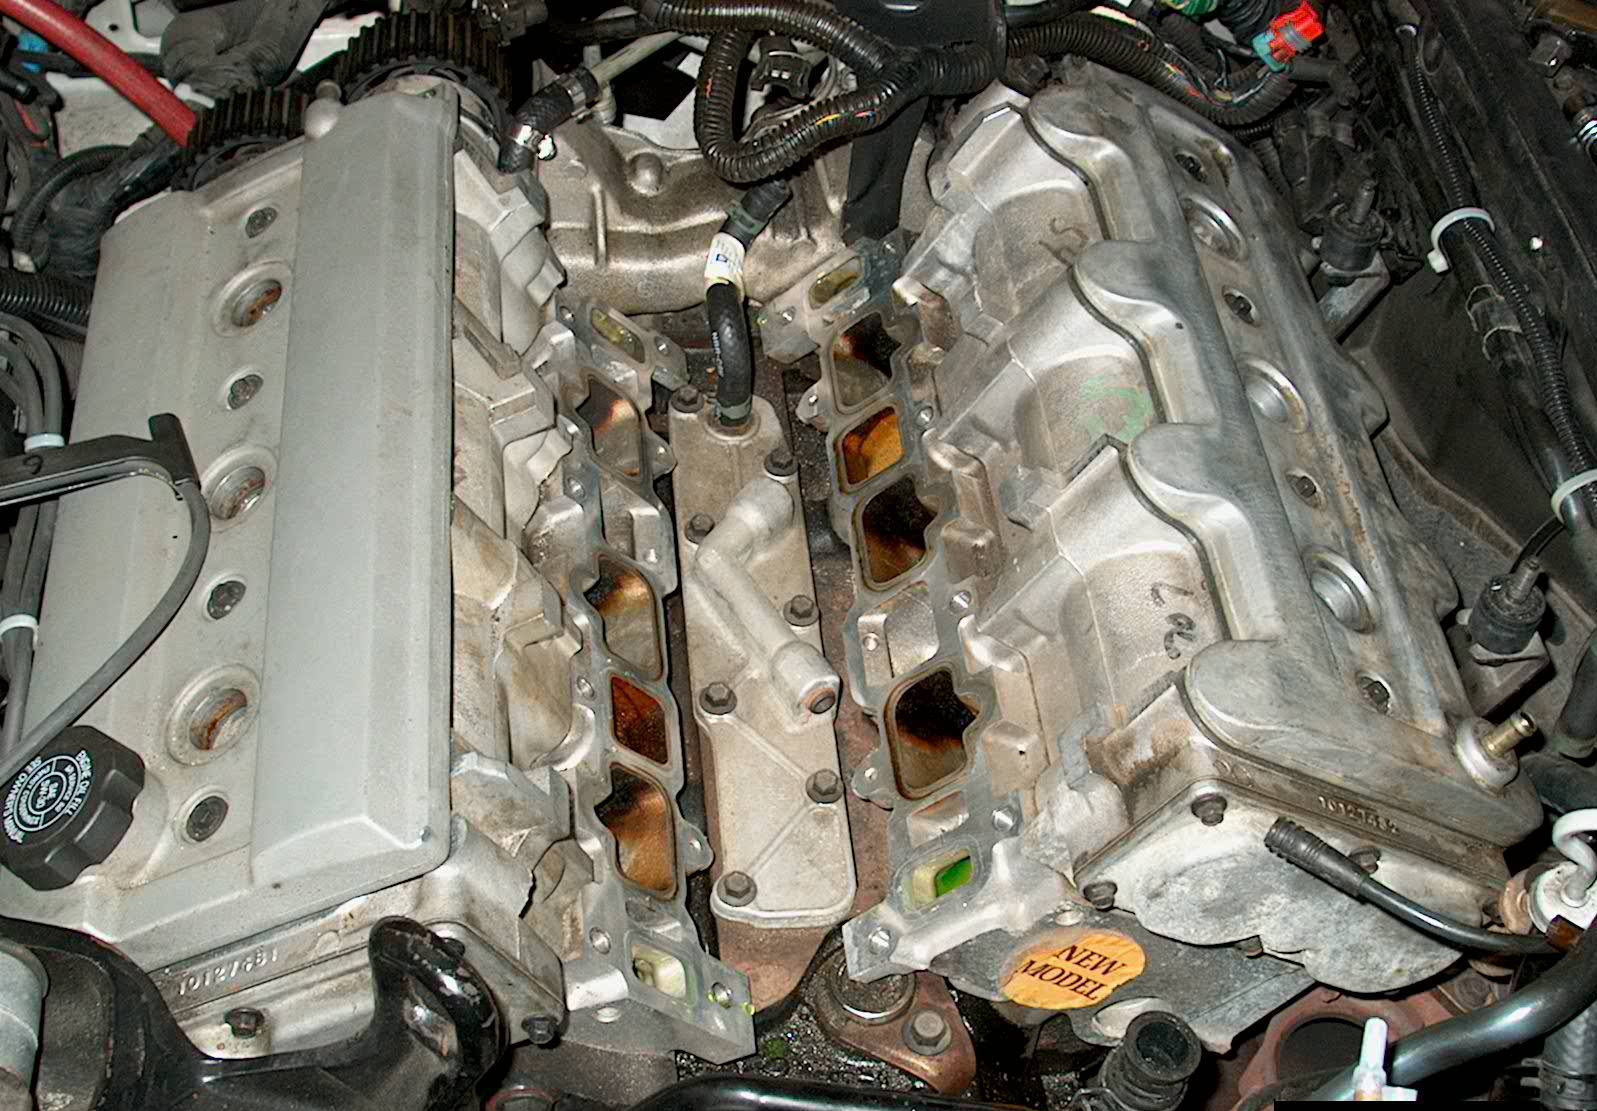 There should be some consideration taken as to whether or not you may wish to replace certain other parts. Flushing and changing the coolant, replacing the thermostat, spark plugs and/or wires, PCV valve and the O2 sensor (Oxygen Sensor) can all be done if they are required, or are near their replacement schedule. During this repair, you will be removing certain components from the engine that will allow you very easy access to the specific regions, so you might wish to look into these other areas. Also, while performing the repair, all regions of the engine and its parts should be inspected before being put back into their place. If any doubt exists, and any of these parts are hard to gain access to any other time while the engine is still assembled, consider replacing them. These parts would include vacuum hoses and plastic lines; injector rubber rings; electrical lines; coolant hoses and clamps. The intake consists of the plenum (upper intake manifold) and the lower intake manifold. The replacement gaskets come as a kit through GM, and include one to separate between the plenum and top-surface manifold, two to separate the "V" configuration of the bottom-surface manifold from the front and rear cylinder banks, and a rubber ring gasket to seal a round coolant passage between the plenum and the manifold. Ensure the engine is cold to reduce the chances of severe burns and engine fire. There will be coolant and fuel spillage.
1.) Disconnect the negative battery cable from the battery to prevent accidental start up.
2.) Remove air box intake assembly from engine compartment.
3.) Remove the plastic fuel rail cover below the plenum by unscrewing the two visible nuts.
4.) ** Ensure the engine is cold before proceeding ** Relieve the fuel pressure: Remove the fuel filler cap to release any pressure from the fuel tank. Then, locate the test port on the top left part of the fuel rail; surround the valve with rags. The valve looks the same as a tire valve on your car wheels. Watch your eyes, cover the valve outlet with a rag and press down on the inside of the valve like you would a tire valve to release air. You can use a screwdriver for this.
5.) Turn the throttle wheel wide open to remove the cable linkage from the throttle. Note how the cables are connected to the throttle wheel, and how you remove them. Also note the clips and how they are positioned on the plate they are connected to. Press the retainer clips to remove the cables from the plate. ** You can also remove the entire plate after the plenum has been lifted, and then remove the cables from the wheel - however, the method above allows to keep the plate intact and only having to remove the cables. Just be careful with the plastic cable retainer clips **
6.) Drain some of the coolant through the bottom - right of the radiator plug. This will lower the coolant level from the engine intake to allow removal of the intake plenum without spillage.
7.) Look to the left rear-side of the intake plenum and remove the vacuum modulator connection. ** The Vacuum Distribution Connector holds very brittle plastic lines and connections. Be careful with its removal from the intake plenum and as you turn it aside while removing the plenum itself **
8.) Remove the electrical connections to the sensors at the rear / right of the plenum. These would be for the AIR solenoid; the EGR valve; and the Throttle Position Sensor.
9.) Unbolt the plenum by the five bolts on the top surface, and the two nuts behind the plenum against the firewall. Pay careful attention to the rubber bushings behind the plenum as so not to drop them into the abyss of the engine bay. Do not attempt removing the plenum at this time. This step is only to necessitate access to other components requiring removal. 10.) Remove the Rear Oil Ventilation Line from the plenum.
11.) Remove the PCV Valve Line from the right - rear region of the plenum.
12.) Remove the lower coolant hose connection under the right rear area of the plenum. (This connection can be extremely difficult to gain access to and pry off. Remove the clamp as best you can. To remove the hose, I found it best to place pliers around the hose at the connection and carefully turning it side to side. Once you've cracked the seal the hose has on the plenum nipple, it should pull off with some careful patience. It would be advisable to replace the original hose clamp with a screw-tightening variety. It will be much easier to access and tighten when assembling.)
13.) Remove the bolts to the EGR valve from the right - rear and gently set the valve aside. You will not have to remove the valve entirely. Be careful not to bend the exhaust piping too much. ** At this point ensure all further connections with the intake plenum have been removed and carefully lift the plenum from the engine. Be careful if you require setting the plenum down as you do not want to scar the gasket surface of the plenum or the lower intake manifold **
14.) The gasket surfaces on both the plenum and the lower intake manifold should be cleaned thoroughly with a gasket scraper and proper solvent. Also clean off the old O-ring from the coolant passage area between the plenum and the lower intake manifold. Be extra careful not to allow any debris to fall into the intake ports. A tip would be to set a vacuum close to the work area while you clean the surface.
15.) Before replacing new gaskets, ensure the surface regions are free of debris and oil. It is especially important that the surface area is clean to avoid any further leaks. When replacing the new surface gasket, you may wish to use a tacky gasket application spray to further enhance the seal on both sides of the surface.
At this point you may wish to consider various other parts replacement.
The following is a list of other parts and components you may be able to replace now that there is generous access to them:
- spark plugs
- spark plug wires
- O2 (Oxygen sensor)
- thermostat
- fuel injectors and / or O-rings
- rear carrier cover gasket
- any broken or cracked vacuum lines
Assembly is the pretty much the opposite of removal. Pay extra attention to the vacuum lines to avoid pinching or breaking them. Refill the coolant and use the proper procedure required for bleeding the cooling system while filling. ** Ensure the cooling system is properly bled or there may be risk of overheating or engine damage **
- Average Time: 4 - 6 hours
- Scheduled Maintenance: whenever it goes out
- Written by Chris "ShadowDog" Sapriken
- Pictures by Kelly
- Edited by Erik Melander
|