|
Changing the 3.4 DOHC alternator yourself could save you up to $300-$500 dollars in labor. The problem with the alts, the location is not the best place; buried deep within the engine. Many mechanics actually charge you more then they should because of this. It goes back to the "black sheep" of GM V-6's. The process is a pain, but can be accomplished. Lets do it... 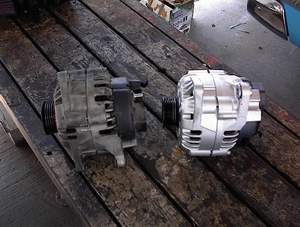
1.) Remove the battery
2.) Put the battery on a charger (this is a good idea)
3.) Remove the coolant recovery tank
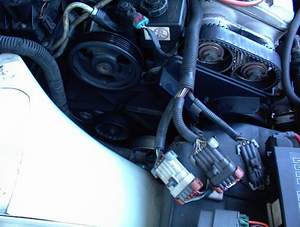
4.) Remove the serpentine drive belt (a 15mm open-end works great for this)
5.) If you follow the power steering lines down, you will notice a clip holding them in place, remove this clip (13mm socket and driver will fit)
6.) Now remove the main bolt the clip was on (this is the first of the alternator bolts to get removed, and is easily done from the top on the car.
7.) Raise the car (use jack stands as well for safety reasons)
8.) Remove the wheel
9.) Remove the splash shield in the wheel well
10.) Remove the speed sensor (connector on the end of the tranny, the alternator connector, the power wire, and the cooling ducting
11.) Remove the 10mm bolt on the back side of the alternator. This is the hardest to remove and install. I found it easy to put my hand around the tranny mount, it took some time, but I was able to remove it. Just has to be worked on until you find what works
12.) Remove bottom mounting bolt (13mm), remove alternator
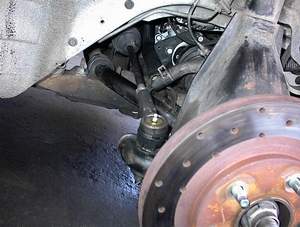
13.) Undo the 18mm tie-rod bolt on the bottom of the lower control arm (has a cotter pin as well)
14.) Take a ball joint puller (is basically a fork type of device) and hammer the tie-rod out. To do this, place the fork between the lower control arm and the tie-rod, then hammer the fork in until the tie-rod pops out. This does take some hammering but don't be careless
15.) Once it is removed, put the key in the ignition and turn the steering wheel to the right. This pulls the tie-rod end inside the engine, giving you enough room to pull the alternator out of engine bay
Once it is removed, check the voltage regulator harness for possible open wires that can lead to electrical shorts and the early death of a new alternator. Otherwise, the install is basically the reverse process as the removal instructions. To install the tie-rod, turn the steering back to normal, put the tie-rod into the lower control arm, it will go down just enough to put the bolt back on, then tighten with an impact wrench and install the cotter pin. Your wheel alignment will be off, so take it to get aligned after the work is completed. I chose removing the tie-rod end process because of the time and head-ached saved instead of removing the axle assembly.
- Average Time: 3 - 4 hours
- Scheduled Maintenance: usually every 75K - 100K miles
- Written by Steven Cromer
- Edited by Erik Melander
|